Monday, November 29, 2010

Crate Paper: Fringe Trim on a Snowy Banner!

I have a tutorial to share with you today with a fun technique I used on this "Snow" banner I created using the "Snow Day" collection from Crate Paper. You can find the "Snow Day" collection in the Noel Mignon store. I love the bold, fun colors in this collection that are sure to brighten up any dreary winter day. I hand drew my mitten template and cut the snowflakes out using the Christmas/Noel cartridge with my Cricut. I wanted something to hang across my china hutch and I love that the banner isn't necessarily for Christmas but something I could keep out through January and February and March and April (sometimes winter in Iowa lasts that long, you know?!) (Be sure to click on the images to see them larger.)


Here's another look at my banner and all the fun bits and pieces of ribbon, tulle and paper. 


To keep things consistent, all of the mittens were cut using the "Mittens" patterned paper (aptly named, don't you think?) I chose to bring out the teal, yellow, pink and green of the patterned paper and used somewhat neutral patterns from the Crate Paper collection to create accordion medallions edged with silver Stickles. The kraft centers were punched using a scalloped circle punch. The chipboard letters are Melissa Frances and I also used mica flakes to add to the snowy look. 


I used the "Shadow" feature on the snowflakes and backed them with kraft cardstock. The Cricut cartridge was Christmas/Noel.


The ribbons are by various manufacturers including American Crafts, May Arts and Basic Grey. 


I strung the banner on a wire and curled it to help hold the pieces of it in place. 


And here's my tutorial on how to create the fringe trim I made on the mittens. The trim color coordinates on each individual mitten with the accordion medallions. As I was putting the banner together, I tried to come up with ways to give it extra dimension and texture. That's how this fringe trim was born! 

First, I cut five 1" pieces of Melissa Frances white crepe paper. 


Next, I stacked the pieces on top of each other and then machine stitched down the center. 


I used a fine tip scissors to cut small fringe on either side of the machine stitching. 


The piece should look like this after cutting the fringe. 


Next, I used my fingers to ruffle up the trim and it looked like this when I was finished.


I used Tattered Angels Glimmer Mist on this particular piece of fringe. I sprayed one coat and let it dry with a heat gun to speed the drying process. Then I repeated this step. 


Once dry, I ruffled the fringe a bit again. 


Here's a look at the fringe on one of the mittens.


And here's the completed banner again...I love the pops of color! 


I can't wait to try this technique out on a layout or card!

Have a great Monday! :)

Thursday, November 25, 2010

All We Want for Christmas with Bedford Falls!

Happy Thanksgiving, everyone! We're celebrating with family today but my post is all about Christmas and the beautiful "Bedford Falls" kit from Noel Mignon. A song that really touched me several years ago is "All I Want for Christmas is a Family" by Steven Curtis Chapman. The song is all about a young child desiring a family and someone to love them for Christmas. I've shared much about how adoption has been a part of my family so I'm sure you can imagine why I love this song. Christmas was always a painful holiday for me because I had always imagined what it would be like to have a little boy or girl enjoy the magic and spirit of Christmas. 

So, when I saw the Fancy Pants Designs sticker "All I Want for Christmas...", I knew I had to use it on my layout. I just altered it a little bit for my use with the tiny Cosmo Cricket green stickers. I love the red faux-stitched thickers in the kit and used those for the "Family" part of my title.


Here's a close-up...


For my Christmas tree, I used the Pink Paislee banner stickers and arranged them up and down on kraft cardstock to form the tree. The star on top is a Fancy Pants stickers and then I placed Melissa Frances pearls on the tree as ornaments. 


All of the patterned paper I used on the layout is Pink Paislee. I added a little machine stitching for a homespun feel and journaled around the edge of my layout.

I hope you are enjoying your Thanksgiving and I'll have more work to share in the coming weeks using "Bedford Falls".

Tuesday, November 23, 2010

Noel Mignon Bedford Falls Reveal!

Well, hello there! Today, I'm sharing the beautiful reveal of Noel Mignon's jam-packed Christmas kit called "Bedford Falls". This kit is full of EVERYTHING you need for your Christmas crafting, whether you are working on layouts, cards, home decor or a December Daily album. I've completed one layout so far that I will share in a couple days. Major manufacturers include: Fancy Pants, The Girls' Paperie, Making Memories, We R Memory Keepers and Pink Paislee. It's a beautiful combination of more traditional red and green with hints of blue, yellow and pink. 


That's all for me today. I've been busy, busy creating but of course, nothing I can share yet. :) We're hopefully getting our Christmas tree up today so that's done! 

Have a good one! :)

Friday, November 19, 2010

Scaredy Cats!

Good morning, friends! Today, I have a layout to share with you using Inspired Blueprints Sketch #60 and the gorgeous "Sleepy Hollow" kit from Noel Mignon. I love using sketches as starting points but for me the end results often end up looking nothing like the sketch. And that's okay! Sometimes a sketch just helps with general placements of photos, titles, journaling and embellishments and other times it's great to interpret it exactly as it's drawn. I love these photos of my girls wearing their Halloween shirts and cute, purple hats I picked up at Target. The patterned paper in the background is a die-cut by We R Memory Keepers. I just inked the edges of it with white Staz-On ink to help it pop off the page and to give it a shabby feel. If  you click on my layout, you'll also see that I machine stitched around the edges of it. 


For the title, I used the Pink Paislee and Making Memories alphabets in the kit. 


I cut out a cute little black cat from one of the We R Memory Keepers patterned papers in the kit and used foam adhesive to pop him off the page. Then, I wrapped the Pink Paislee purple tinsel trim around the edges. 


The little bats are Making Memories metal embellishments (had to use two of them, of course!) :)


I picked up The Girls' Paperie Toil & Trouble sticker book and that's where the journaling spot and black and cream die-cut border stickers came from. 

I'm so glad it's Friday. We have a busy weekend ahead and are hopefully putting up our Christmas tree on Saturday. I like to do it early so I don't have to think about it later in the month. I really want to get a lot of the busyness of the season out of the way (shopping, sending out cards, etc) so that I can enjoy everything through my girls' eyes. I can't wait for Christmas this year!

Have a great weekend!

Thursday, November 18, 2010

My Mind's Eye: Blog Challenge #17

Whoa! You're getting two posts in one day from me! :) Every month for the past few months, I've been trying to do the monthly blog challenge at My Mind's Eye. This month, I especially loved the sketch and theme of "Lessons Learned". For my layout, I even got my husband to get in on the action and journal his thoughts about his first year as a father and the lessons he's learned along the way. A few months ago, I did the same thing on a layout for myself and I know the girls will really appreciate our thoughts about fatherhood and motherhood someday.

Here's a look at my layout:


The photo was taken at a session this past May with our very talented friend, Justin Meyer. I used a vintage dictionary page as the background for the Maya Road kraft envelope. The patterned paper is from several My Mind's Eye collections including Lush and So Sophie. I love the combination of cream, green, teal and brown - yum! 

Here's a look at my title...the top two alphabets are My Mind's Eye and the teal alphabet is by American Crafts. I brushed it with a little paint to tone down the color. The brad is also My Mind's Eye. 


I punched a heart with a Fiskars punch and placed a My Mind's Eye brad through the center. 


Here's a look at daddy's journaling printed on a piece of My Mind's Eye patterned paper. 


The bird and flower were cut from My Mind's Eye patterned paper. The dots were punched from the Lush collection using a Martha Stewart starburst punch. 


Here's the sketch for the challenge:


Thanks for looking and have a great day! :)

American Crafts Challenge: Thanksgiving Place Cards

This week I decided to play along with the American Crafts Thanksgiving Place Cards challenge. For my place card, I took a  5.5" x 8.5" piece of kraft cardstock and folded it into a tri-fold so that it would be free-standing on the table. I punched along the top edge of the cardstock with a Fiskars Apron String punch and inked all the edges. I used the beautiful Metropolitan collection by American Crafts on the place card, specifically highlighting the striped "Boulevard" patterned paper. I free-hand drew a tree trunk and top on the back sides of some of the patterned paper. The little hearts are punched using a Fiskars punch...I thought the hearts made super cute "leaves" and "leaf piles" on the bottom of the place card. Each person's name can be added to the top of the tree using American Crafts Minimarks Rub-ons (Ginger) in brown. 


On the inside of the tri-fold, I used the American Crafts Journaling Book 1 in Brown Remark Sticker book for the journaling lines and date. 


Each family member can write what they are thankful for and then the place cards could made into a little album simply by punching a couple holes, adding jump rings and a picture next to the person's name. Simple, right?!

Have a great day! :)


Wednesday, November 17, 2010

Mini Kit Winner & GCD Studios Theme:: Christmas Gifts!

The winner of the Midnight Rooster mini kit for November is:


caroline hancock said...

Brilliant LO's Jill as usual of course. i am thankful (apart from the obvious of course) fot scrapbooking, and the friends i have met through this awesome hobby of ours :)
Caroline, please shoot me an e-mail cornellgj(at)yahoo(dot)com with your address and Midnight Rooster will get the mini kit sent out to you!


So sorry for my delay in posting! I have so enjoyed all of your comments on my blog lately about adoption and other things...so sweet to read. My girls were really sick over the weekend and I'm just now getting us back into the swing of things. We were supposed to go out of town for a family Thanksgiving but instead we spent the weekend at urgent care and in our pajamas. The girls don't just get a simple cold...it turns into horrible breathing problems that are more or less asthma attacks. We would have been in the ER with both of them had we not had a nebulizer machine. 


My post today is all about Christmas. I'm so excited about Christmas this year...it should be a lot of fun with the girls! 

I love creating Christmas gifts for my friends and family and chose to make a wine gift box using GCD Studios' new "Joyful Peace" collection. The rich, elegant colors of gold, burgundy, green and cream are just gorgeous when paired with holiday staples of cinnamon sticks, snowflakes and pine cones. Here's a look at my wine box...It was paper mache so I painted the sides and top of it burgundy:


I bought small white doilies (found in the cake decorating aisle at the craft store), cinnamon sticks and snow-frosted pinecones and berries for the top of the box. I hot glued the arrangement on the top after I painted the berries with burgundy paint. (They were bright red and didn't fit with the color scheme of my project). 


I wrapped twine ribbon around the box and tied it in a bow. Then, I attached a rusty snowflake with twine to the bow for a country-ish look. 


All that's left to do is add a bottle of wine and your gift is ready to give!


Until next time,
Jill


Friday, November 12, 2010

The Great Pumpkin Adventure!

Happy Friday, friends! I have a 2-page layout to share with you today using the stunning "Dear Diary" kit at Noel Mignon. Gasp! Yes, I said a 2-page layout. It's definitely out of my comfort zone to do a 2-page layout but it's something I'm trying to do more and more. I used primarily Lily Bee Designs products on my layout and even did a little misting using Glimmer Mist in Tiger Lily and Coffee Shop for added texture.


Here's a close-up of my title. I used Crate Paper and Jenni Bowlin sticker labels, Cosmo Cricket alphabet stickers, Pink Paislee alphabet stickers (from Sleepy Hollow) and American Crafts thickers. 


For the pumpkins, I hand drew a template and then pieced them together using Lily Bee patterned paper. You could certainly use a Cricut or other die-cut machine. I also machine stitched the pumpkins together.  The leaves were punched with a Martha Stewart maple leaf punch and I used foam adhesive on several of them for added dimension. 


Here's a look at my banner and journaling. 


I definitely enjoyed creating this 2-pager and hope to do more! It's a cool, rainy fall day in Iowa today. I don't mind a snuggly day here and there! We're enjoying an early family Thanksgiving this weekend and then next week is busy, busy, busy with something going on every day. Don't forget to comment on my post below for the mini kit giveaway!

I'll be back soon! :)

Thursday, November 11, 2010

Midnight Rooster November Kit & Giveaway!

It's time for the Midnight Rooster November kit reveal and that means I can share my work with this month's kit. The entire kit was fabulous....the combination of patterned papers and embellishments were awesome to work with! This kit quickly became one of my favorite Midnight Rooster kits to date! I also got the add-on this month. 

Here's my first layout...a 2-pager?! Yep (click on it to see larger)! I love the progression on this page that tells the story of our first trip to the apple orchard. Daddy and Nora worked together and Lily and I got in on the picking too! I pulled out patterned papers by Studio Calico, The Girls' Paperie, Jillibean Soup, American Crafts and Cosmo Cricket - all colors in the photos and created a border around the layout. I used an "apple" flashcard by K & Company from my stash on this layout. The wavy punch is EK Success. 


Here's a close-up of the flash card with Martha Stewart twine wrapped around it. That gorgeous blue lace trim is in the kit as well as the Jenni Bowlin star sticker. 


Another close-up of my title...I machine stitched across the alphabet stickers to ground my title.


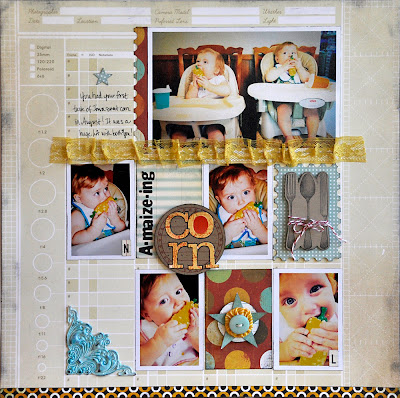
For my next layout, I created another grid on the Studio Calico documentary patterned paper. I love these photos of the girls trying Iowa sweet corn for the first time. Lily especially loved it and got to where she was about eating the cob! :) I used a Fiskars postage stamp border punch on the American Crafts and Crate Paper patterned paper. The gorgeous yellow lace and the fork, spoon and knife stamp are all in the kit. I sprayed the Pink Paislee corner with Tattered Angels Glimmer Mist and inked up the edges. 


Here's a close-up of my title. The Studio Calico alphabet is in the kit and I pulled the black Basic Grey letters from my stash...had to play on the "corny" title, you know?! :)


I also got some use out of my Fiskars star punches on this layout. The little yellow fabric yo-yo is actually a pin in the kit that I removed. 


For my final layout this month, I used the Fancy Pants patterned paper as a base and then went to town with my Martha Stewart maple leaf punch. This was the only photo we snapped of us all at Thanksgiving last year on the Cornell side so I wanted to be sure to scrap it. I tied the lace in a bow and used glue dots to adhere it as a border along my photo. 


Yum! Love those leaves! 


Here's a close-up of the texture from the ribbon...


And my title...I find that outlining the title with a journaling pen can really make it pop!


Here's my card for this month...had to get some more use out of the fun fork, spoon and knife stamp. 


And now I've got a lovely mini kit to give away this month...


Leave me a comment and answer this question...

Besides the obvious (family, your home, etc), what is something simple that you are thankful for?

For example, I'm thankful for Raspberry Mochas at Starbucks and that lovely little break each day called "nap-time"! :) I'll draw a winner on Saturday. Thanks for checking out my work this month! :)

 
Site Design By Designer Blogs